How to Setup IMAP Account in Outlook for Mac
If you want to set up your email in Outlook for Mac using the IMAP protocol, this guide will walk you through the entire process. IMAP (Internet Message Access Protocol) allows you to access your email messages from multiple devices, keeping your emails synchronized across all platforms. In this article, you will get a complete guide on how to setup IMAP account in Outlook for Mac in easy steps.
What is IMAP and Why Use It?
IMAP lets you view and manage your email directly on the mail server. This means changes you make (like reading, deleting, or organizing emails) sync across every device connected to that email account. It’s ideal if you check email on your phone, tablet, and computer.
Before You Start: What You Need
- Your Email Address: The full email address you want to add (e.g., yourname@example.com).
- Password: The password for the email account.
- IMAP Server Settings: This includes the incoming mail server address, outgoing mail (SMTP) server, and port numbers. These vary depending on your email provider. For example:
- Gmail IMAP Server: imap.gmail.com
- SMTP Server: smtp.gmail.com
- Outlook for Mac Installed: Make sure you have Outlook installed on your Mac.
Step-by-Step Guide to Enable IMAP in Outlook for Mac
#1: Open Outlook on Your Mac
Launch the Outlook application from your Applications folder or Dock.
#2: Add a New Account
- Click on Outlook in the top menu bar.
- Select Preferences.
- Choose Accounts from the Preferences window.
- Click the + button at the bottom left corner and select New Account.
#3: Enter Your Email Address
- Type your full email address and click Continue.
- Outlook will attempt to automatically configure the account. If this fails, you will be asked to enter settings manually.
#4: Choose IMAP Configuration
If automatic setup doesn’t work or you want to set it up manually:
- Select IMAP/SMTP as the account type.
- Enter the following details:
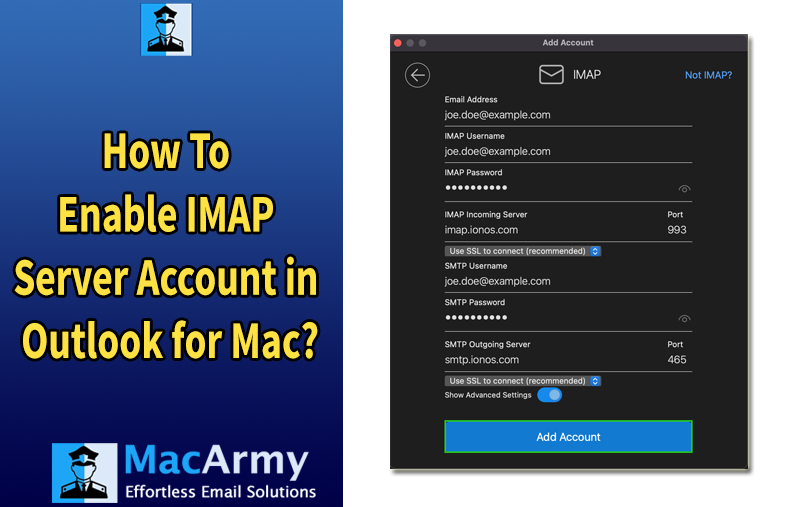
Incoming Mail Server (IMAP):
- Server: (e.g., imap.yourprovider.com)
- Port: Usually, 993 for IMAP with SSL enabled.
- Encryption: SSL/TLS
Outgoing Mail Server (SMTP):
- Server: (e.g., smtp.yourprovider.com)
- Port: Usually, 587 or 465
- Encryption: SSL/TLS or STARTTLS
- Provide your username (usually your full email) and password.
#5: Complete Setup and Test
- After entering the details, click Add Account or Sign In.
- Outlook will verify your credentials and server settings.
- Once verified, your account will appear in the Accounts list.
- Send a test email to ensure the setup works correctly.
Tips for Troubleshooting IMAP Setup on Outlook for Mac
- Check Your Password: Make sure it’s correct and up-to-date.
- Verify Server Settings: Double-check the IMAP and SMTP server names, ports, and encryption settings. Your email provider’s website usually lists these.
- Enable IMAP on Your Email Account: For some services like Gmail, you must enable IMAP access in the web settings first.
- Check Internet Connection: A stable internet connection is essential.
- Update Outlook: Ensure your Outlook for Mac is updated to the latest version.
How to Enable IMAP Access on Popular Email Providers
Gmail
- Log in to your Gmail account via web.
- Click the gear icon and go to Settings.
- Select the Forwarding and POP/IMAP tab.
- In the IMAP Access section, select Enable IMAP.
- Click Save Changes.
Yahoo Mail
- Log into Yahoo Mail on the web.
- Go to Settings > More Settings > Mailboxes.
- Under your account, ensure IMAP is enabled.
Outlook.com / Hotmail
- IMAP is enabled by default for Outlook.com accounts.
Conclusion
Enabling an IMAP account in Outlook for Mac is straightforward once you have the right server details and credentials. Using IMAP ensures your emails are synchronized across all your devices, providing a seamless email experience.
If you follow these steps carefully and verify all settings, your Outlook for Mac will be connected and ready to manage your emails efficiently.
Helpful Tips:
While enabling an IMAP account in Outlook for Mac is usually straightforward, sometimes users face challenges when dealing with older Outlook data files, especially OLM files, the proprietary format Outlook for Mac uses to store emails, contacts, calendars, and more.
If you want to switch from an older Outlook setup to a new IMAP account or migrate data between different email services, you might need to convert or extract your data from OLM files. This is where third-party tools like MacArmy OLM Converter come in handy. This software allows you to directly export Outlook for Mac data to PST, PDF, MBOX, EML, CSV, Office 365, Gmail, Thunderbird, and many more saving options. Take advantage of its batch conversion feature to save time if you have multiple files
