How to Clear Outlook Cache on macOS Without Losing Data?

Microsoft Outlook is a leading desktop application for handling emails, contacts, calendars, and more. Over time, its performance can degrade, leading to lags or unexpected errors. A practical way to resolve these issues is by clearing the Outlook cache regularly. This blog provides clear instructions on how to safely clear Outlook cache on macOS without any original data loss, including the classic version, the new Outlook, and Outlook on Mac.
In this guide, we’ll walk you through various manual methods to delete Outlook cache on Mac, along with a professional solution for users looking for a faster or more reliable approach.
What Exactly Is Outlook Cache?
The Outlook cache is a temporary storage area on your device that stores frequently accessed data locally. Its main purpose is to help Outlook retrieve information quickly without constantly fetching it from the server. Think of it as a smart assistant that keeps essential data readily available, reducing load times and improving the overall performance of the application.
By caching key elements, Outlook enhances user experience by ensuring smoother navigation, faster access to content, and minimal delays, especially in environments with limited or unstable internet connectivity.
What Does Outlook Cache Store?
Outlook cache can include a variety of data types, such as:
- Recently accessed emails and attachments
- Auto-complete entries and cached contacts
- Calendar events, reminders, and meeting invitations
- Stored login credentials and authentication data
- User interface preferences and account settings
- Offline Address Book (OAB) for quick contact lookups
All this information helps Outlook operate efficiently, especially when working offline or switching between mail folders. However, over time, the cache can grow excessively or become corrupted, which is why periodic clearing is recommended.
Why Is It Necessary to Clear Outlook Cache on Mac?
Clearing the Outlook cache on your Mac is like tidying up a cluttered workspace, it helps streamline operations and improves efficiency. Over time, cached files can accumulate and become outdated or corrupted, which may lead to sluggish performance, sync failures, or unexpected behavior in Outlook.
Regularly erasing cache files not only optimizes Outlook’s speed and responsiveness, but also helps free up system resources on your Mac. A monthly cleanup is generally recommended to maintain optimal performance for both Outlook and macOS.
Additionally, it becomes especially important to clear the cache when:
- A new update is available for Outlook or macOS
- You notice slow loading times or delays in opening emails
- Emails stop syncing properly or folders appear out of date
Performing a cache cleanup ensures Outlook runs smoothly and that new updates or settings are applied correctly without interference from outdated cached data.
How to Clear Outlook Cache on Mac?
Here are several effective methods to clear the Outlook cache on your Mac:
#1: Clear Cache via Folder Properties
- In the Navigation Pane, right-click on the Exchange folder causing issues.
- Select Properties.
- Click Empty Cache.
- Outlook will then fetch fresh data from the server and rebuild the cache.
#2: Reset Outlook Account (New Outlook for Mac)
- Go to Tools > Accounts.
- Select the account you want to reset.
- Click the three dots (…) next to the account and choose Reset Account.
- This will clear the local cache and resynchronize all data with the server.
#3: Manually Delete Cache Files
- Close Microsoft Outlook completely.
- Open Finder and press Cmd + Shift + G to open the “Go to Folder” window.
- Enter ~/Library/Caches and press Enter.
- Locate and delete the following folders (if present):
- com.microsoft.Outlook
- Containers/Microsoft Outlook/Data/Library/Caches
- TemporaryItems/Outlook Temp
#4: Clear Auto-Complete Cache
- Open Outlook and start composing a new email.
- In the To: field, type the unwanted email address.
- When the suggestion appears, click the “X” next to it to remove it from the auto-complete list.
Clear Outlook Cache on Mac Without Losing Data
When it comes to clearing Outlook cache on Mac, it’s crucial to safeguard your valuable email data. Cache issues can sometimes lead to data corruption or make your Outlook information inaccessible. To avoid any potential loss, a reliable solution is to convert your Outlook OLM files into a more secure and versatile format before clearing the cache.
MacArmy OLM Converter for Mac is a powerful tool designed to protect your Outlook data while helping you manage cache-related problems. This application allows you to convert OLM files into over 15 different formats, including PST, PDF, MBOX, EML, TXT, CSV, DOC, and even cloud services like Gmail, Office 365, Yahoo, and more.
![]()
![]()
With its user-friendly interface, MacArmy OLM File Converter is accessible to both technical and non-technical users alike, making the process smooth and hassle-free. The software also offers several advanced features that let you customize the conversion based on your specific needs. To ensure confidence in the tool, you can try its free demo version to explore its functionality and understand how it works before committing to the full version.
Guide to Convert OLM Files into a Suitable Format on Mac
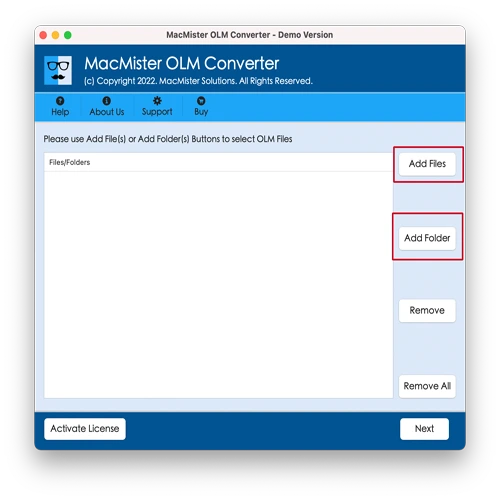
#1: Download and launch the software on your Mac.

#2: Click on Add File(s) or Add Folder to load your OLM files into the software, then click Next.
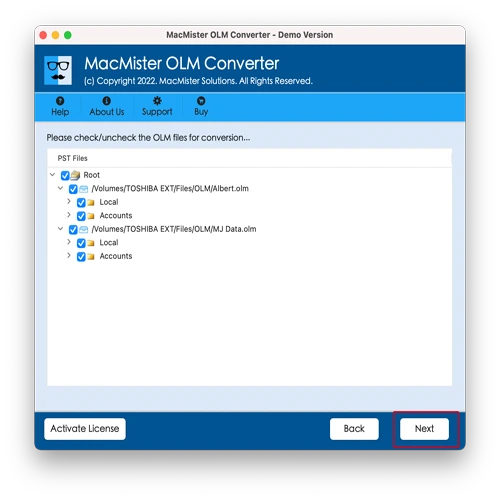
#3: Review the list of loaded files displayed in the panel and click Next to continue.
#4: Choose Select Saving Options, then pick the desired output format from the dropdown menu.
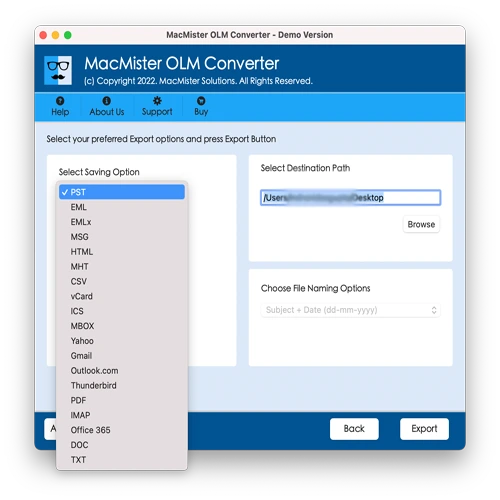
#5: Customize any sub-options or settings as needed, then click Export to start the conversion process.
#6: A Live Conversion Report window will appear, showing the real-time progress of your OLM file conversion.
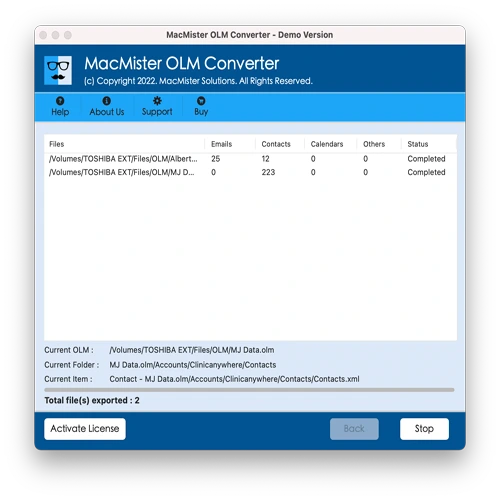
In just a few seconds, the conversion process will complete, and a “Conversion Completed” notification will appear. Click OK, then navigate to the specified folder to review your converted files. Upon checking, you’ll find that the tool has accurately completed the task, preserving the entire data without any alterations or loss.
Final Thoughts!
In this blog, we’ve explored the top methods to clear Outlook cache on Mac, a crucial maintenance task to ensure optimal performance for both Outlook and your macOS device. Try the manual methods provided here if you prefer free solutions, or consider paid tools if you need advanced features and faster results. Choose the approach that best fits your needs. If you have any questions or require further assistance, feel free to reach out to MacArmy Support for expert help.