How to Create a New Profile in Outlook for Mac?
Outlook for Mac offers a handy feature called Profiles, which helps you stay organized by separating your accounts and settings based on different areas of your life like work, personal, school, or others. By creating and switching between profiles, you can keep your emails, calendars, and preferences focused on what matters most at any given time. In this post, we’ll walk you through the solution how to create a new profile in Outlook for Mac, so you can streamline your communication and boost your productivity with ease.
Outlook is one of the most widely used email clients on Mac, offering robust support for both Windows and macOS. Despite being a Microsoft product, it’s fully optimized for Mac users, making it a powerful tool for managing not just emails, but also calendars, contacts, notes, events, and more all in one centralized hub.
One of the key features that enhances user productivity in Outlook for Mac is the ability to create Profiles. A profile in Outlook includes your accounts, data files, and customized settings. If you use Outlook for multiple purposes such as work, school, or personal life profiles allow you to separate and manage each environment efficiently. This helps keep your digital life organized and reduces distractions.
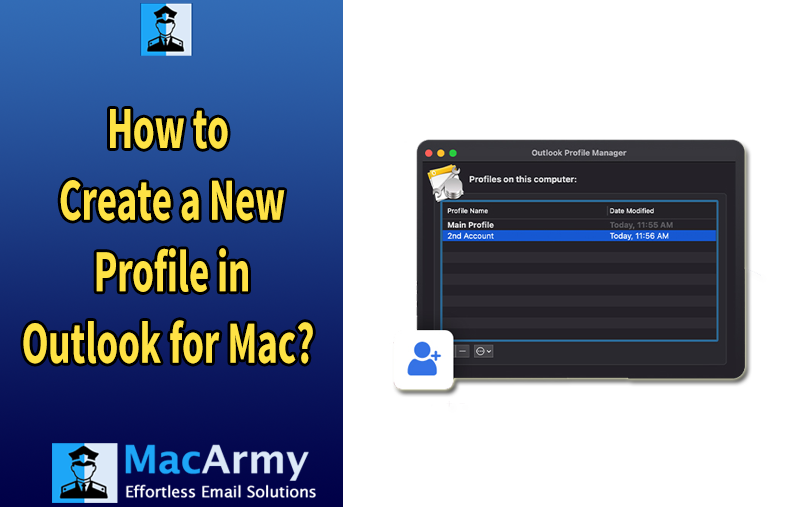
To manage profiles, Outlook for Mac includes a built-in tool called the Outlook Profile Manager (formerly known as the Microsoft Database Utility). This utility lets you create new profiles, modify or delete existing ones, and choose a default profile that loads automatically when Outlook starts. It’s an essential feature for anyone who wants a tailored and organized Outlook experience on their Mac.
How to Create a New Profile in Outlook for Mac?
Before you create a new profile in Outlook for Mac, there are a few key points to consider. Make sure that creating a new profile is necessary perhaps your current profile is corrupted, or you simply want to start fresh. If the old profile is no longer needed, it’s a good idea to delete it to free up storage, as Outlook will redownload all your emails and data in the new profile, which can consume significant space.
Keep in mind that Outlook profiles on a shared Mac are not private. Unlike separate macOS user accounts, Outlook profiles are not password protected. Anyone using the same macOS account can search and access Outlook data using Spotlight.
Steps to Create a New Outlook Profile on Mac
To get started, make sure Outlook is completely closed. Then follow these steps:
- Open Finder on your Mac.
- Go to Applications. If you don’t see it in the sidebar, click the top menu bar and select Applications from there.
- Locate the Microsoft Outlook app, right-click (or Control-click) on it, and select Show Package Contents.
- Open the Contents folder.
- Inside it, go to the SharedSupport folder.
- Launch the Outlook Profile Manager.
Once the Profile Manager is open:
- Click the plus (+) icon in the bottom-left corner to create a new profile.
- Enter a name for your new profile (choose any name you prefer).
- To make this your default profile, click the three-dot icon next to the profile and select Set as Default.
- Close the Profile Manager.
Now, open Microsoft Outlook, and it will load with your new profile. You’ll be prompted to set up your email account as if it were a fresh installation.
Important Considerations Before Creating a New Profile in Outlook for Mac
Creating a new profile in Outlook for Mac is a straightforward process, but there are a few key things you should take into account before getting started. These precautions will help ensure a smooth transition and prevent any unintentional data loss.
1. Backup Your Existing Outlook Data
Before setting up a new profile, it’s essential to back up your existing Outlook data. Creating a new profile may result in the loss of emails, contacts, calendars, and other important items if not properly preserved. To avoid this risk, export or save your crucial mailbox content in advance.
2. Prepare to Reconfigure Your Email Accounts
If you have multiple email accounts set up in your current profile, keep in mind that you’ll need to reconfigure each of them in the new profile. Make sure you have all the necessary account details at hand, such as email addresses, server settings, and passwords.
3. Transfer Calendars and Contacts
Outlook for Mac does not automatically migrate personal items like calendar entries and contact lists when a new profile is created. If you’ve been using Outlook to manage these items, you’ll need to manually export and import them into the new profile to retain access.
By taking the time to plan and prepare, you can ensure that creating a new Outlook profile on your Mac is both safe and efficient. Let me know if you’d like step-by-step backup instructions or tips for moving data between profiles.
How to Back Up Outlook Data on Mac
Backing up your Outlook data on Mac is essential especially when you’re planning to create a new profile. While it’s possible to back up your Outlook for Mac data manually by exporting it to an .olm file, the process can be complex, time-consuming, and prone to errors, particularly for users without technical experience.
To simplify the backup process and minimize the risk of data loss, it’s a good idea to use a reliable third-party tool like MacArmy OLM Converter. This professional utility allows you to convert your Outlook for Mac (.olm) files into multiple formats, including PST, which is compatible with Outlook for Windows. This makes it especially useful if you’re considering migrating from Mac Outlook to Windows Outlook in the future.
The tool is user-friendly and designed for individuals with basic technical skills. It offers a range of helpful features such as data preview, flexible saving options, and detailed log reports, making the backup process efficient and manageable.
Conclusion
Creating a new profile in Outlook for Mac is sometimes necessary whether due to corruption in the current profile or simply for a clean start. However, it’s important to plan ahead. Setting up a new profile can lead to the loss of vital information like emails, contacts, and calendar events if no backup is taken.
To protect your data, always back up your Outlook for Mac (.olm) file before proceeding. Using a reliable tool like MacArmy OLM to PST Converter ensures a secure, efficient, and flexible backup process, helping you manage your Outlook data with confidence.
